Home - Information Services - Get Help - How-to-Guides - WebAdvisor - Class Lists - Import a Class List into Excel
Import a Class List into Excel
- On a campus computer, type This PC in the
search box on the task bar.

- Select This PC from the search results.
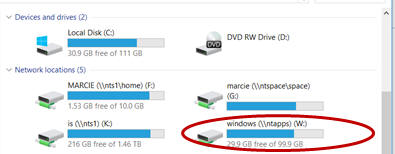
- Under Network locations, double-click the W: drive.

- Go to Apps > MCUtil > ClassLists.
- Right-click on your class list, select Copy,
and paste the file on your desktop.
- Open Excel.
- On the File tab, click Open.
- On the Open window, select All Files
across from the File name field.

- Select your class list .txt file.
- Click Next on the Text Import Wizard window.
- Make sure that Delimited is selected.

- Click Next.
- Uncheck Tab and select Comma.

- Click Next.
- Click Finish.
- Save the Excel file.
