Home - Information Services - Get Help - How-to-Guides - Zoom - Zoom for Faculty - Scheduling Meetings - Schedule a Meeting Using the Zoom Desktop Client
Schedule a Meeting Using the Zoom Desktop Client
- Log in to the Zoom desktop client.
- Click Schedule.

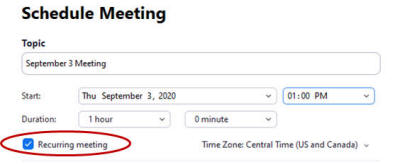
- Enter the meeting title, start date & time, and duration.

- If you're scheduling a recurring meeting, then select
Recurring meeting. (You'll specify the recurrence
information later on the Outlook meeting invitation.)

- Under Meeting ID, select the desired option.
(Most of the time, you'll want to select Generate
Automatically so that a unique meeting ID is generated for
each meeting. Your personal meeting ID is a static number used to
access your personal Zoom meeting room. Once someone has your
personal meeting ID, they can access your personal meeting room
anytime you're using it for a meeting unless you lock the meeting or
use the Waiting Room feature to admit participants
individually.)

- Under Security, make sure that Passcode is selected.

- If desired, select Waiting Room. (When Waiting
Room is selected, your students will be placed in a virtual waiting
room after they join the meeting, and you’ll need to admit them
individually or all at once to the meeting. If you’d prefer to have
your students automatically admitted to the meeting after they join,
then don't select this.)

- Under Video, configure the options as desired.
(If you leave both the host and participant
video set to Off, then you and your students can
start your video when you're ready after you join the meeting.)

- Under Audio, accept the default
Telephone and Computer Audio.

- Click Advanced Options and configure the
options as desired.

- Enable join before host - When this setting is enabled, your students can join the meeting before you do.
- Mute participants upon entry - When this setting is enabled, your students will be muted automatically when they join the meeting. (They can then unmute themselves when they’re ready to speak.)
- Only authenticated users can join - When this setting is enabled, only students who have Zoom accounts will be able to join the meeting. (Since students aren’t required to have a Zoom account to join meetings, it’s recommended that you keep this setting disabled.)
- Automatically record meeting - When this setting is enabled, recording will start immediately after you join the meeting. (If you want to control when the recording starts, then disable this setting.)
- Click Save. An Outlook meeting invitation will appear containing the meeting link and other meeting information. (It may take a minute for the meeting invitation to appear.)
- If you’re scheduling a recurring meeting, then, on the meeting invitation, click
Recurrence.

- Specify the recurrence pattern and an end date. (If you don't
specify an end date, then the meeting will appear on your calendar
and your students' calendars indefinitely.)

- Click OK.
- Send the meeting invitation to your students. (A copy of the email will appear in your Sent
Items folder, and the meeting will be added to your and your
students' Outlook calendars.)
Note: Your students do not need to click Accept on the meeting invitation; they can simply close it. When they close the meeting invitation without clicking Accept or sending a response, then the meeting will still appear on their Outlook calendars.
